Why is your AirPods Blinking Orange? How to Fix it?
Nowadays people mostly prefer to use AirPods for listening to songs or for any purpose. Therefore, the AirPods are now dominating the market in the past few years because of their amazing and convenient features and design.
However, while using the AirPods you might come across the Airpods flashing or blinking orange light but have you ever wondered why is your AirPods blinking orange? How to fix it? Then do not worry at all. As this blog has the perfect answer to your queries.
All you need to do is to read the blog carefully until the end to better become aware of the steps or methods that could help you to sort out the issue easily in case you ever come across such issues.
What do AirPods LED Indicator Lights Mean?
It is important to the people who are using AirPods that the light indicator works for both the AirPods and the case. Therefore, it is vital for you to know when your AirPods are inside the case as the LED indicator will show you the status of the airpods. However, if the AirPods are outside of the case, the LED indicator shows the status of the case.
Below is brief information about the LED light inside and outside of the case:
When your AirPods are Inside the Case
When your AirPods are Outside the Case
Why are my AirPods Flashing Orange?
There are several reasons why AirPods flash orange. It is worth mentioning that 3 LED lights show the status of your AirPods. The 3 LED colors are, Red, Orange, and Green. So, when your Airpod case starts blinking orange, it simply means that:

Or, if you are wondering why is my AirPods case blinking red then it has a pairing issue or its battery must be extremely low.

Below are the 3 major reasons why is my Airpods case blinking red:
1: Low Battery
If your AirPods show a red light then the battery capacity is getting very low. Moreover, when the Airpods are not placed in the case and a red light appears then the case indicates that you need to charge it. However, at this time, the case will only allow the user to extract one additional charge before its battery drains completely.
So, if the AirPods are in the case & still show red light then understand the battery is getting recharged. Therefore, wait for a while until & unless it is fully charged. So, once it is fully charged then the green light will appear which indicates that the battery is completely charged now.

2: Incorrectly Stored Airpods
Always remember to place your AirPods correctly in the case. Otherwise, a red light could appear on your AirPods in case they are not properly placed.

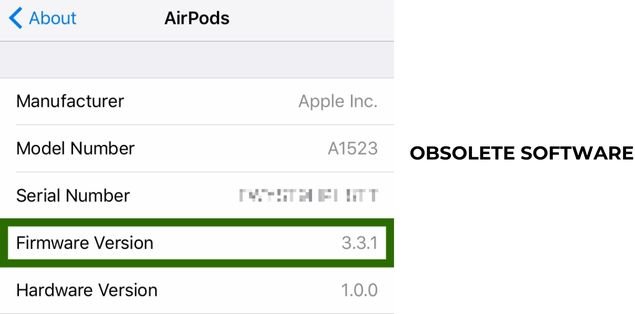
3: Obsolete Software
Make sure to update your AirPods regularly. The other reason why is my AirPods case blinking red could be a software issue. So, to avoid such issues, make sure to have the latest update for your AirPods.
And, if you are still curious to know the 4 reasons why is Airpods case flashing green then read the below reasons:
1: One of the AirPods is not Recognized by the Case
Your AirPods case cannot figure out which Airpod is either the left or right AirPods.
2: AirPods Firmware is Outdated
The other reason is that the AirPods are not updated regularly which can cause the issue. However, firmware updates are usually released in order to fix issues with the AirPods
3: One AirPod is not Charging Properly
The reason why one of the airport is not charging properly can be dirt buildup inside the AirPods’ case, stopping them from charging.
4: One of the AirPods is Damaged
In case you recently dropped or got your AirPods wet, then there is a chance that there is hardware damage inside.
How to Fix AirPods Flashing Orange Light Step-by-Step with Images (8 Ways)
Below are the 8 ways to fix the flashing orange light on AirPods:
Way #1: Unpair and Pair your AirPods Again
In case you are wondering why are your Airpods blinking orange then to sort it out first make sure to unpair your Airpods from all devices and then after a while pairs them again. Sometimes, this method results quickly and correctly. To do that, follow the following steps:
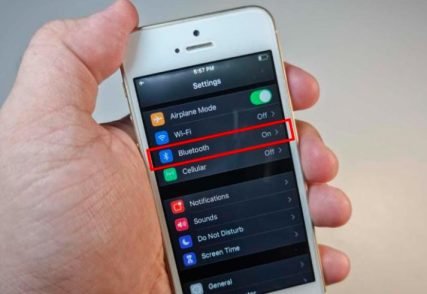
Step 1: Go to your setting and click on Bluetooth.
Step 2: After clicking on Bluetooth, the list will appear showing many results.
Step 3: Now, click on Airpods from the list and then choose Forget this Device among the options from the list.
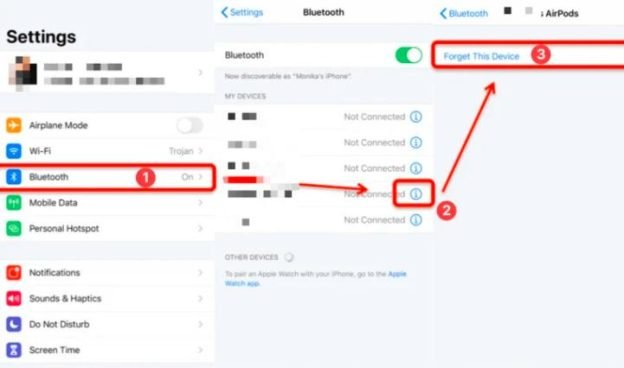
Step 4: Now, put your AirPods in the pairing mode. All you need to do is to hold the button on the back of the case for about 5 seconds.
Step 5: Once the AirPods are in pairing mode then reopen your Bluetooth settings and choose Add Device option from the list and follow the instruction in order to pair them.
Way #2: Restart your iPhone/iOS Device
Sometimes restarting your device can help you to clear up any bugs or errors that might be the cause stopping the AirPods from working well. Therefore, in order to restart your iPhone, follow the following steps:
Step 1: To restart your device, hold the power button of your iPhone on the right side for a few seconds until you see the Slide to Power Off option.
Step 2: Once your iPhone has turned off then make sure to wait for about 3o seconds.
Step 3: Next, turn your device on by holding the power button unless you see the Apple Logo.
Step 4: Once your device is on then try to pair your AirPods again.
Way #3: Reset & Reconnect your AirPods
Most of the time the reset option is quite an effective way to resolve your issue. As the resetting make sure to delete any kind of errors or bugs from your device. So, in order to avoid interruption, make sure your AirPods and your audio device must have at least 20% of battery left before going through the reset process.
Below are the steps to reset or reconnect your AirPods:
Step 1: First, put your airpods inside the charging case and wait for about 30 seconds.
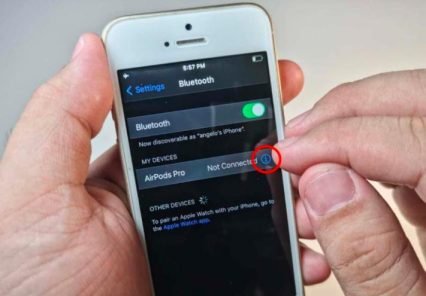
Step 2: Now, go to the Setting then on the Bluetooth section and click on the (i) icon option next to Airpods.
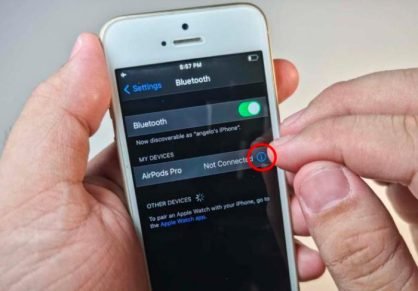
Step 3: Next, click on Forget this Devcie option.
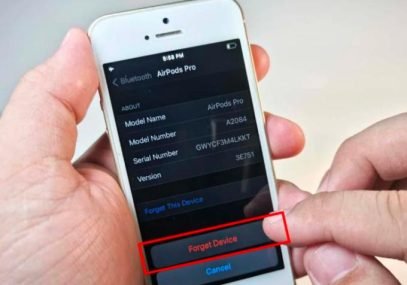
Step 4: Make sure to open the lid of your AirPods charging case.

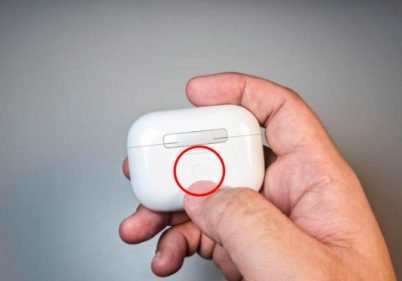
Step 5: Now, press the setup button for 15 seconds until the status of AirPods light flashes orange then white.
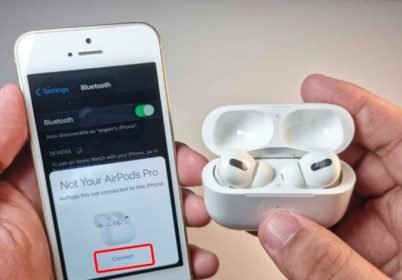
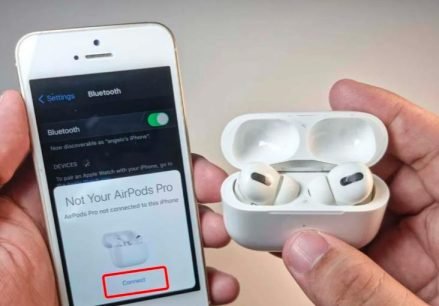
Step 6: Lastly, wait for the connection prompt in order to pop up on your phone and then reconnect your AirPods or AirPods Pro.
Way #4: Restart your Audio Source
Sometimes audio sources can also experience some major issues that might be the cause of the connectivity issues. Therefore, restarting your audio source can help out open apps even those running in the background that may create connectivity issue
Way #5: Recharge the AirPods and the Case
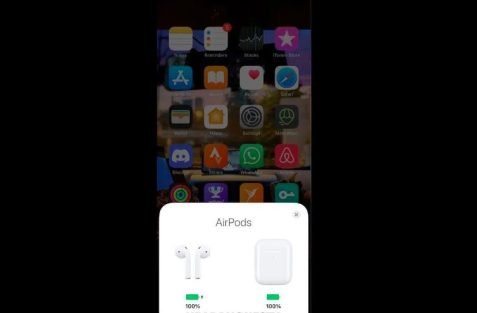
For any Airpods variants, the orange light on Airpods indicates that you need to charge them. So, in case your AirPods still flash orange light then a quick plug-in into a power can sort out the issue. Therefore, to check whether your AirPods or AirPods Pro are charging then bring them closer to your Apple device and then open their lid. So, a window must pop up on your screen showing the battery status.
Way #6: Clean your AirPods
Dirt or debris can also be the cause sometimes and prevent proper connection of AirPods. Therefore, cleaning your AirPods is a must in order to prevent any damage. So, using the right ancillary tools and the right places to clean is a must. Below are the accessories you need to clean your AirPods:
Below are the ways to clean your AirPods:
Step 1: First, use dampen a toothbrush and a cotton swab with alcohol in order to clean the edges of the AirPods and the inside of the charging case.

Step 2: Now, using the toothpick, just pick out any remaining debris inside the edges of the AirPods.

Step 3: Next, make sure to complete cleaning by rubbing off the pieces of the AirPods along with the case with a lint-free cloth lightly dampened with alcohol.

Way #7: Update your AirPods’ Firmware
Your AirPods are simply run by firmware. So, discrepancies between the AirPods firmware and the iOS version may cause bugs that might bring connectivity problems time and again. Moreover, the other reasons can also be that the left and right AirPods do not seem to have the same firmware version which may result that one of them is not working properly.
So, all you need to do is to check out your AirPods firmware and match it with the latest firmware release. To do that so, follow the following steps:
Step 1: First, connect your AirPods to your device.
Step 2: Now, go to the settings then go to the Bluetooth section.
Step 3: Click the (i) situated next to your AirPods name.
Step 4: Now, just look at the number next to the firmware version.

Way #8: Ask for Apple Support
In case all the methods above failed to sort out your issues then try to ask for Apple support. As Apple support allows you to access Apple’s solutions database or perhaps connect with someone from Apple who can easily support you.
Below are the steps to guide you on how to use Apple support in order to address the flashing orange light concern:
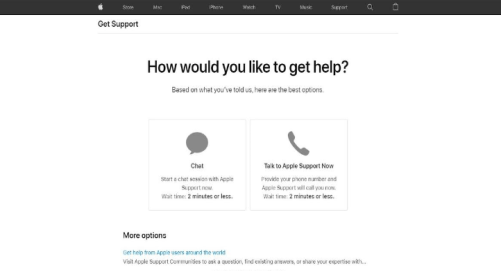
Step 1: Go to the Apple Support Page.
Step 2: Now, scroll down the page then click on Start Now.

Step 3: Next, just enter the location.

Step 4: Now, select AirPods then More and then type in the issue you are experiencing.

Step 5: Next, select between a chat or a call session with Apple Support, therefore, follow their instructions.
Why is my AirPods Not Connecting? (7 Easy Steps)
Below are the steps to sort out why are my AirPods not connecting:
Step 1: First, ensure your iPhone or iPod must have the latest version of iOS or the latest version of iPadOS.
Step 2: Now, put both AirPods in the charging case and ensure that both AirPods are charging.
Step 3: Next, in order to make sure that Bluetooth is on, go to Settings and then on the Bluetooth section
Step 4: In case your AirPods are connected, make sure that they’re selected as your audio device. If your AirPods appear among the list of devices but they do not connect then simply go to the next step.
Step 5: Now, close the lid and wait about 15 seconds, then open the lid. Press and hold the setup button on the back of the charging case for up to 10 seconds. The status light on the front of the charging case must flash white, which means that your AirPods are ready to connect.
Step 6: So, hold the charging case, with your AirPods inside and the lid open, next to your iPhone, iPad, or iPod touch.
Step 7: Follow the steps on the screen of your iPhone, iPad, or iPod touch and then make sure to test your AirPods. In case it still did not connect then reset your AirPods.
Frequently Asked Questions (FAQs)
Below are the FAQs about why is your AirPods blinking orange? How to fix:
Q1: What do the light colours mean on AirPods?
Ans: The light colours in the AirPods mean that the charging case is charging. So, if the LED is blinking or flashing white then your AirPods are ready to pair up via Bluetooth.
Q2: What does the orange flashing light mean on your AirPods?
Ans: The AirPods that flash orange light means that your AirPods have pairing issues.
Q3: What light shows when AirPods are charging?
Ans: The charging status of the Airpods is signified by the case status light. So, it is charging in case it has an amber or orange light. So, the light will turn green once the battery is fully charged.
Q4: Why is my AirPod case light orange?
Ans: Because AirPods and charging case are charging.
Conclusion
The blog has amazingly covered all the required information on why is your AirPods blinking orange? How to fix it. The blog will surely help you to sort out your issues easily. Therefore, all you need to do is to read this blog carefully with full consideration.
Make sure to visit our website Qnnit for more informative and helpful blogs. Read these blogs that might further help you get to know more about AirPods, iPhone and its latest features: How to Charge AirPods Pro?, What does the Arrow Next to the Time on Your iPhone Mean?, How to See Blocked Messages on iPhone, and How to Turn Off iPhone 11, 12, 13 – All the Methods Explained.