Recording Minecraft gameplay and sharing it on video platforms is a common way to document gaming experience and connect with other players. Whether you’re showing off your skills, creating tutorials, or just entertaining yourself, you may need more than just basic screen recording. You may also want to capture your reactions and provide commentary via webcam video and microphone audio.
To achieve this, you’ll need specialized screen recording software. In this guide, we’ll provide simple yet effective steps to ensure your Minecraft videos are lag-free and enjoyable for your audience.

How to Record Your Minecraft Gameplay on PC
For those who want to record Minecraft gameplay on PC, the FonePaw Game Recorder is the best solution. It allows you to record your entire screen, a specific area, or an application interface at resolutions up to 1080p. You can effortlessly capture audio and webcam clips during the recording process, making it easy to add personal comments or reactions to your videos.
Additionally, this recorder features built-in editing tools for real-time enhancements such as circles, text, and arrows, making it ideal for creating tutorials or instructional content. Minecraft gamers will love its lag-free feature that records games at a smooth 60 fps for high-quality, lag-free videos.
Key Features of FonePaw Game Recorder
- Records webcam and voice during gameplay, seamlessly integrating them into your videos.
- Captures 4K 60FPS videos without time limits and allows customizable frame rate settings.
- Automatically tracks and displays mouse cursor movements and keystrokes.
- Features a built-in toolbar for adding annotations during gameplay recording.
- Provides multiple output formats for recorded videos, including MP4, MOV, and more.
With all these powerful features, you can start to record your Minecraft gameplay on PC using the FonePaw Game Recorder by following the simple steps below.
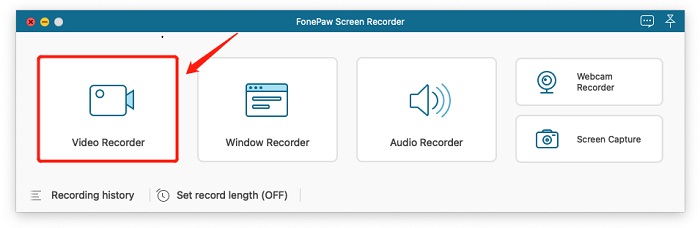
Step 1. Download and Launch FonePaw Game Recorder
Begin by downloading and installing the FonePaw Game Recorder on your PC from the official FonePaw website. Once installed, launch the software to get started.
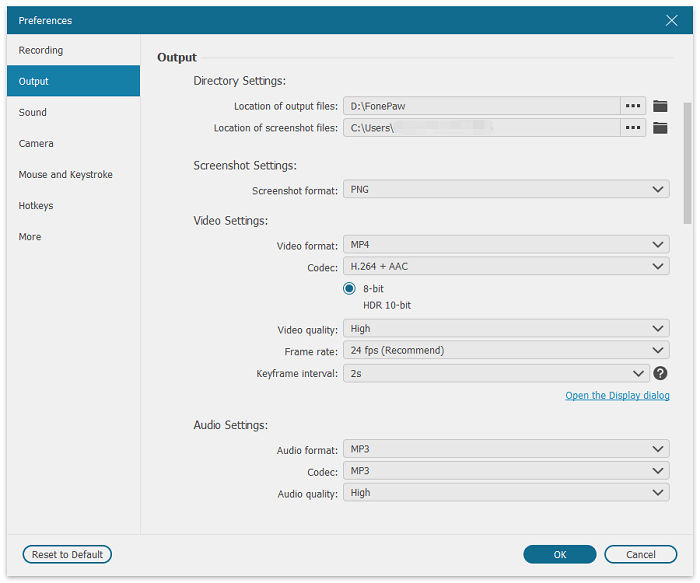
Step 2. Customize Personal Settings
Click the “≡” icon on the menu bar to enter Preference Settings. You can customize many parameters such as your preferred output format and frame rate. For high-quality gameplay recordings, we recommend optimizing settings with the H.265 codec and a 60 FPS frame rate to maintain 4K quality without excessive storage consumption.
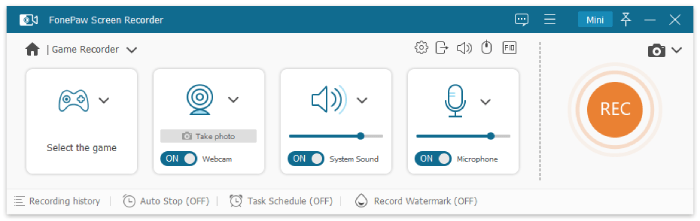
Step 3. Start Recording Minecraft Gameplay on PC
Now that you’ve set everything up, it’s time to record your Minecraft gameplay. Launch the game and return to the FonePaw Game Recorder interface, which will identify the game’s recording area automatically. Adjust the sound settings to your preference, then click REC to start recording your gameplay smoothly without any lag.
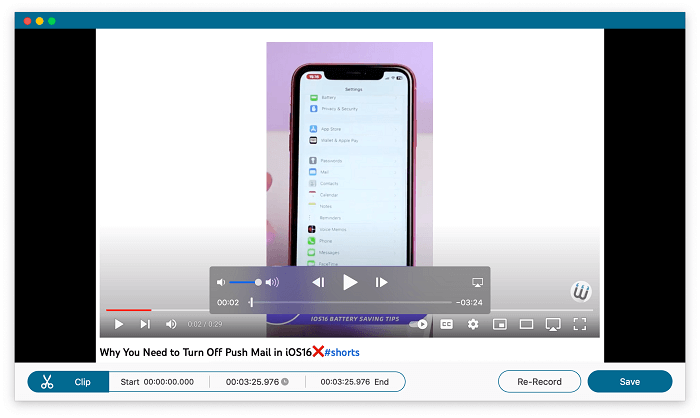
Step 4. Edit the Video (Optional) and Save it
While recording, you can add real-time annotations to make your videos more engaging. When you’re done, click “Save” and choose where to save your video. After that, you can also use the built-in tools for further video editing.

How to Screen Record Minecraft on Mac
Although the Mac offers a built-in QuickTime player for recording, it falls short when it comes to capturing system sounds. To record both gameplay and immersive game audio, you need a more versatile solution, and that’s where the FonePaw Game Recorder for Mac comes in.
FonePaw Game Recorder is one of the top screen recorders for gaming, known for its user-friendly interface and powerful features. It allows Mac users to effortlessly record on-screen activities, whether it’s a game session, a tutorial, and more. In addition, it eliminates the hassle of lost game audio and ensures that videos are engaging.
Now, let’s dive into the steps to record your Minecraft gameplay on your Mac using FonePaw Game Recorder. The steps to use it closely resemble those outlined above for recording on a PC, so we’ll go through it briefly.
Step 1. Download and install FonePaw Game Recorder on your Mac, and then launch it.
Step 2. Before you begin recording your Minecraft gameplay, customize your recording parameters by going to the Preferences Settings.

Step 3. Click the “Rec” button to start the recording and then launch Minecraft and start playing your game. FonePaw Game Recorder will seamlessly capture your entire Minecraft experience, including the Mac’s internal sound.

Step 4. While recording, you have the option to add annotations, text, shapes, and drawings to your video in real time. Once done, click the “Save” button.
Record Minecraft Gameplay with Built-in Xbox Game Bar
For those who don’t want to bother with extra software, Windows PC offers the built-in Xbox Game Bar for capturing and recording gameplay, including Minecraft. This tool serves various gaming functions like recording clips, taking screenshots, and monitoring system performance while gaming. However, please note that this software is exclusive to Windows PC, not for Mac users.
Here are the steps to record Minecraft gameplay using the built-in Xbox Game Bar on Windows:
Step 1. While playing Minecraft, press “Win + G” to bring up the Xbox Game Bar. It will overlay on your Minecraft game screen.
Step 2. Click on the “Capture” button within the Xbox Game Bar’s widget menu and choose the “Pin” option to keep it handy.

Step 3. Return to your Minecraft game screen and click the red “Record” button to start recording your gameplay. Once you’re finished, your recorded video will be automatically saved on your PC.
Conclusion
In summary, this article explores various ways to record Minecraft games. Although the built-in Xbox Game Bar provides a convenient option for Windows PC users, it is not available for Mac users and has some limitations, including recording time limitations and the inability to customize the recording area and audio settings.
To overcome these issues, we recommend the FonePaw Game Recorder, which offers powerful screen recording features. Whether you’re on Windows or Mac, FonePaw Game Recorder makes it easy to record and share engaging Minecraft gameplay videos with no lag.