What is DDC/CI?
As displays become larger and more complex, a plethora of new capabilities appear on next-generation monitors. These include v-sync, night mode, auto-brightness changes, and a slew of other new features.
Because most individuals are unaware of these new qualities, they go undetected. In this essay, we will discuss DDC/CI on monitors.
DDC/CI is an abbreviation for Display Data Channel / Command Interface. It is a method for computers and monitors to communicate with one another, allowing software on the computer to operate the monitor.
In general, you must struggle with bulky monitor buttons to set values for things like brightness, color, and saturation, among other display control factors. Using DDC/CI alters this since these values may be adjusted using software on your PC rather than going through your monitor’s troublesome OSD.
The Plug and Play capabilities of your display are derived from a basic level of DDC/CI, but more complex forms allow you significantly more flexibility. Some high-end monitors also have auto-pivot, a technology that uses a rotating sensor embedded into the monitor to guarantee the image is always straight, even if the monitor is physically moving.
How to Use DDC/CI?
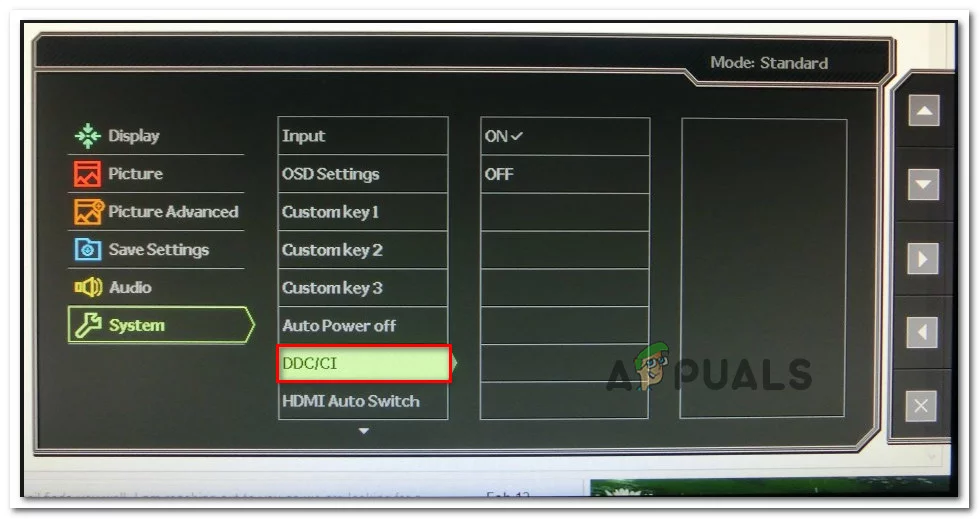
The first step is to ensure that it is enabled on your displays. While the setting is usually enabled by default, it never hurts to double-check. All you have to do is enable the option in your monitor’s OSD. There’s no telling which manufacturer places the feature in which part, so you’ll have to experiment a little.
To adjust your monitor’s settings, you’ll need control software or, in this case, a control interface (the CI part of the word). Some manufacturers, such as Samsung, have proprietary software for their displays, such as MagicTune. However, these are not universal answers.
If you’re searching for a one-size-fits-all solution, consider EIZO ScreenManager Pro or Monitoring.
ClickMonitorDDC is a freeware portable utility that lets you alter the brightness and contrast of any DDC-compliant monitor by manipulating a set of sliders. You may quickly access your monitor’s controls by clicking on the software’s notification icon (in the Taskbar Tray area).
Here’s a brief tutorial for enabling, installing, and configuring DDC/CI using ClickMonitorDDC:
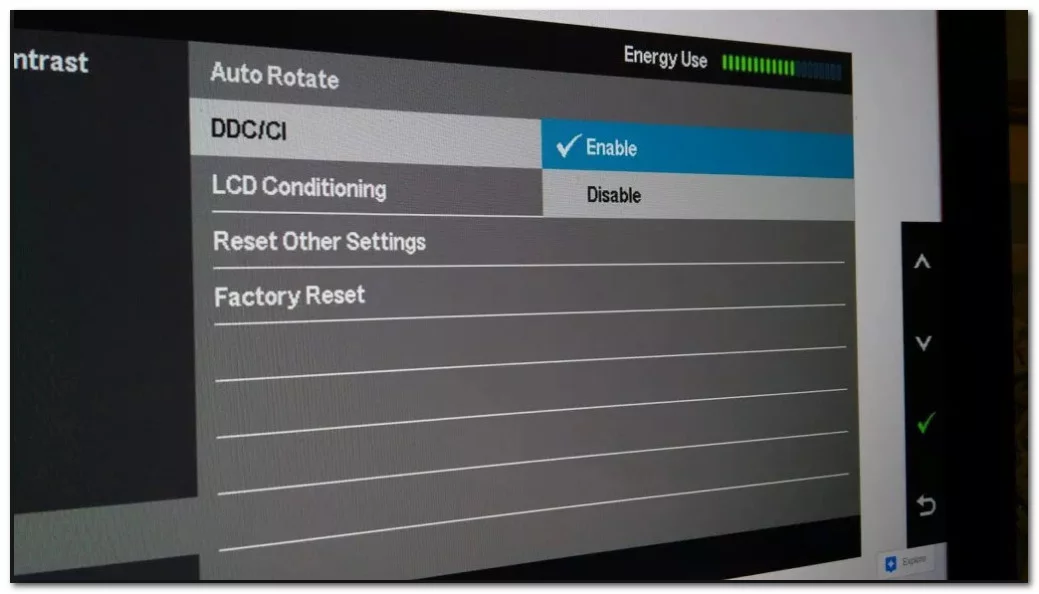
- Look through the settings to determine whether DDC/CI is enabled by pressing the physical Settings button on your display. If it isn’t, be sure you activate it. As you may expect, the specific processes will vary from manufacturer to manufacturer
- To obtain the most recent ClickMonitorDDC version, go to this website and select Download Setup Version
- Although portable versions are available, our research revealed that installing it using Windows Install is far more stable
- When the download is finished, double-click the ClickMonitorDDC installation program and select Yes at the UAC (User Account Control) window to give it administrator capabilities
- Because the installer isn’t signed by a verified publisher, you may need to choose Show more details and Yes at the UAC prompt
- To finish the installation, simply follow the on-screen instructions. You don’t need to change anything; simply leave the default settings alone and click Install to finish the installation.
- Launch ClickMonitorDDC after the installation is complete
When you initially run the application, it will automatically detect all of the displays connected to your computer. It performed well on a dual-monitor configuration (Asus + Acer). At the top, you can view all of your connected monitors and operate each one separately.
In addition to altering the brightness, contrast, and volume of the built-in speakers, you can also switch between input sources and shut them off without physically pressing the power button.
You may also go into the ClickMonitorDDC settings to give your monitors unique names and make them easier to find.
Keep in mind that not all displays enable you to adjust the contrast. According to our research, this is most common with laptop screens.
If you don’t like the UI of ClickMonitorDDC, we identified a few additional free options for you:
- display Tuner (only 32-bit)
- softMCCS
- MagicTune (only for Samsung)
However, keep in mind that many applications are either restricted to a specific manufacturer or will necessitate the first configuration by a professional expert. So, if you want something easy that you can put up in minutes, I’d recommend ClickMonitorDDC.
DDC/CI Support and Definition
A subset of DDC/CI instructions are commonly supported by Digital View LCD controller boards. DDC/CI is an abbreviation for Display Data Channel / Command Interface, as defined below. These instructions allow the graphics card to send commands to the LCD controller in order to change the display’s settings. Please check the note at the end for a definition of DDC/CI.
DDC/CI commands are supported on VGA, DVI, HDMI, and DisplayPort displays. DDC/CI functionality has been added on the following Digital View controllers:
Compact multi-input controller boards ALR-1920 and ALT-1920.
DD-1920 and DT-1920-HDMI: These models are intended for high-volume display applications.
Functions supported: Check the handbook for the individual model LCD controller to discover which commands are supported; they will most likely be one or more of the following:
- Brightness
- Contrast
- the color RGB
- The source of the input
- VGA, HDMI, and DisplayPort input sources
- Temperature of Color
- Red/Green/Blue Gain for user configuration
- Volume
- Load the factory default configuration.
- Power asserts: On = Always on, shows “No sync” when no input signal is present.
- Standby = Panel and backlight power off.
- Sleep = “No sync” message displayed for 10 seconds before turning off the lighting.
Other Digital View LCD controller board types that allow DDC/CI commands, such that firmware modifications can enable particular instructions, include:
- SVX-4096, SVX-4096-120, and SVX-4096-VW are some of the models available
- SP-4096, SP-1920-Dual-HDMI, and SP-4096-120
- SVX-2560
- SVX-1920v3
- ALR-1920-120