Users have been having a lot of problems since the iOS 17/16 release. The fact that the iPhone continues to display “cannot verify server identity” despite users’ best efforts to resolve the issue is also a serious concern. The inability of consumers to connect their devices to the appropriate IMAP service might be pretty aggravating.

We have some methods if you cannot confirm the server’s identification on your iPhone or iPad. Go over this tutorial and investigate the approaches that can assist you in finding a quick solution to your issue.
Ways to Fix Cannot Verify Server Identify Error on iPhone
Users hurried to install the iOS 17/16 update when the official version was released but now encounter several issues. Among those issues is the inability of iPhone mail to authenticate the server’s identity. This issue with server identity verification arises while installing fresh mail server certificates on an iPhone with stringent settings.
The iPhone retrieves the SSL certificate and verifies its dependability for a mail server connection. It is considered untrustworthy if there is a discrepancy between the domain name and the certificate. Consequently, the iPhone displays the error message “Cannot Verify Server Identity.”
This problem often arises when a user sets up a new email account. However, there are certain flaws in the most recent iOS 17/16 upgrade and modifications to the settings that are suddenly problematic. But do not fear. We have compiled a list of valuable solutions to assist you in solving this issue.
Fortunately, the “cannot verify server identity iPad/iPhone” issue can be resolved in several ways. These are the ones that are suggested for you to attempt.
Below are the ways to fix cannot verify server identify error on iPhone:
Method 1: Restart Your Device
Restarting your iPhone should be the first thing you attempt before attempting more complicated troubleshooting techniques. You only need to continue if the issue results from a minor software bug.
How to restart your iPhone is as follows:
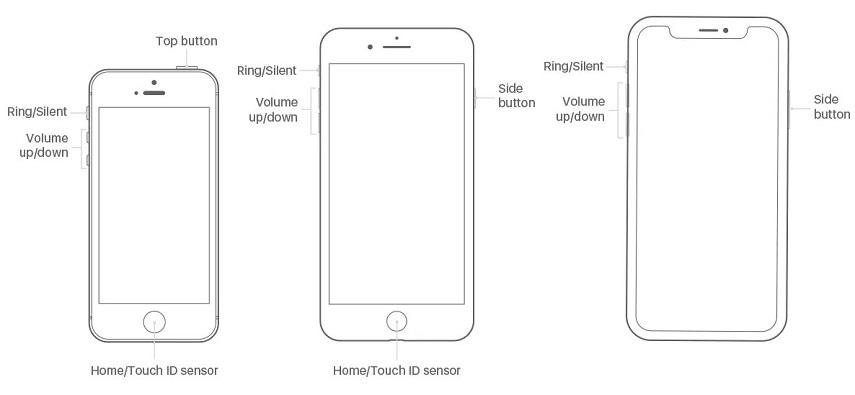
Without a Home button on the iPad or iPhone X, 11 or 12:
Step 1: Press and hold down the iPad’s side/top and volume-down buttons when the power-off slider appears.
Step 2: To turn your gadget off, drag the slider.
Step 3: After some time, press and hold the side button to see the Apple logo.
For an iPad or iPhone with a Home button that is eight or older:
Step 1: Press and hold the side/top button to view the power-off slider.
Step 2: To turn your gadget off, drag the slider.
Step 3: Wait for the Apple logo to show, then press and hold the side/top button.
Method 2: Quit And Restart the Mail App
Among other unexpected or sporadic in-app failures in the Mail app, there could be a message stating that the device cannot authenticate identity on your iPhone or iPad. Usually, restarting the application is all it takes to fix such issues.
As a result, once the Mail app is open on your device, you have to close it from the app preview on your iPhone or iPad and open it again.
Method 3: Reset Network Settings
When you run into the iOS 16/15 problem of not verifying server identity, you can also try resetting your device’s network settings. Using this method, you can reset your network settings to their default state and remove any customized network settings you may have recently. You should reset the network settings if a network problem is causing the issue.
This is how to carry out:
Step 1: Open the “Settings” app on your iPhone or iPad.
Step 2: Proceed to “General” > “Reset” after that.
Step 3: Select “Reset Network Settings” from this menu.

Method 4: Delete Your Mail Account, And Then Add the Mail Account Again
Many people have found that by simply deleting and adding their email accounts again, they can resolve the “iPhone mail cannot verify server identity” error they face when using Mail on their devices.
To give it a try, take the following actions:
Step 1: Navigate to “Settings” on your iPhone or iPad.
Step 2: Click the “Passwords & Accounts” option after that. Click “Mail” or “Mail, Contacts, Calendars” in previous iterations of iOS, and then select “Accounts.”
Step 3: Select the email account that has to be deleted and click “Delete Account.”
Step 4: Select “Delete from My iPhone/iPad” or “Delete Account” to confirm.
Step 5: After the target email account has been deleted, return to “Accounts & Passwords” or open “Accounts” as indicated previously.

Step 6: Select your email service provider and fill out all the required fields by clicking the “Add Account” button.
To finish the email setup procedure, adhere to the on-screen directions. I hope the issue with imap. Gmail’s server identification cannot be verified. Proceed to the following techniques if the problem still occurs.
Method 5: Reset All Settings
It’s time to reset every setting on your iPhone or iPad if you still receive the error message “the identity of cannot be verified by mail.” Using this method, you can return all network, location, privacy, and other settings to their original settings. No data or media are deleted.
Thus, it is worthwhile to give it a shot.
Step 1: Navigate to “Settings” on your device.
Step 2: Next, select “Reset” under “General.”
Step 3: Select “Reset All Settings” from this menu.

Method 6: Disable SSL
Turning off the SSL certificates is a quick workaround you can attempt if you are having trouble identifying the server identity on your iPhone. If the verification feature is turned off, you will likely be able to add a new mail account without verification.
To accomplish this, take the actions listed below:
Step 1: Open the Password & Accounts Settings by launching the Settings app. You will be able to see the problematic mail app on the screen.
Step 2: Open the app and select the account that is registered. You may then access the SSL option by clicking on Advanced Settings; in the hopes that this may resolve the issue, toggle the bar to turn off the feature.

Method 7: Repair iOS System
The ideal solution is to use UltFone iOS System Repair if you are having problems with your iPhone email not being able to authenticate the server identification. This program fixes the entire set of issues and malfunctions in iOS devices.
To fix your system, download the necessary software and adhere to the instructions below:
Step 1: Launch the application and connect the device experiencing software issues. To commence, click the Fix Now button after choosing the Repair Operating System Mode from the home screen.

Step 2: You will be prompted by the software to download the firmware package that is compatible with the software currently installed on your device. After selecting the “Download” option, watch for the file to be downloaded and checked.

Step 3: Select the Repair Now option to start the process once the software is prepared. The program will let you know when the procedure is complete and your device has to reboot.

Your iPhone or iPad will function better and won’t experience the same issue again after the restart. The best part is that there won’t be any data loss because the software will correct the problem.
Conclusion
As you can see, UltFone iOS System Repair makes it simple to fix the “cannot verify server identity” issue on the iPhone mentioned above. No matter how many repairs you attempt, the case will not be resolved when the program is the cause of the problem, even when there are alternative ways to fix it. Therefore, we advise you to utilize the iOS System Repair tool to receive a guaranteed solution instead of focusing your efforts on other remedies.