All Bracer Upgrades
Bracer
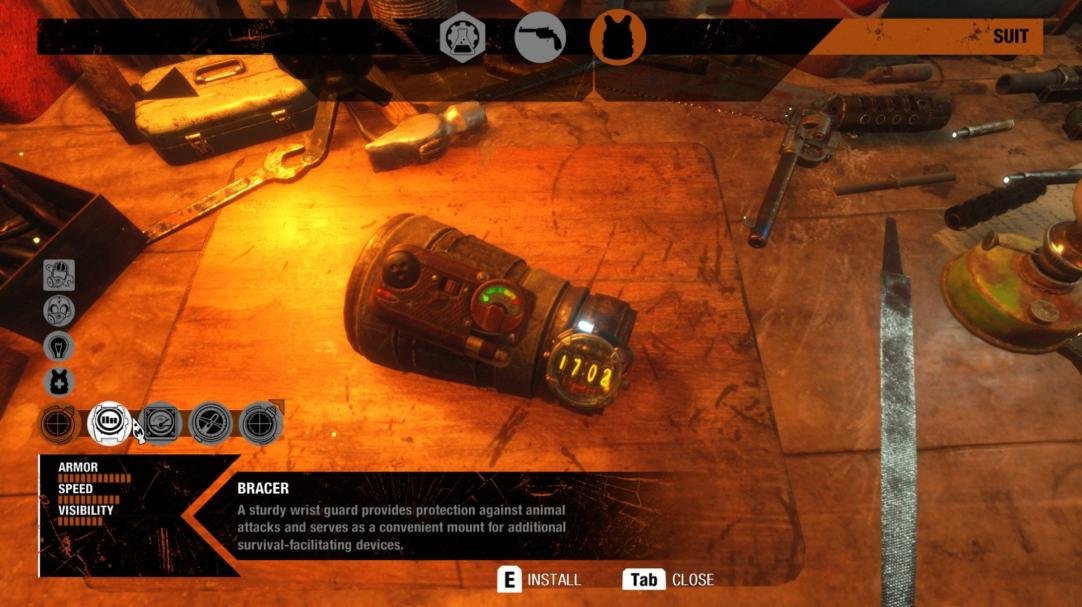
- Description. Hard bracer protects you from monster bites and allows you to install additional devices needed for survival.
- How to unlock: available by default.
Metal Detector
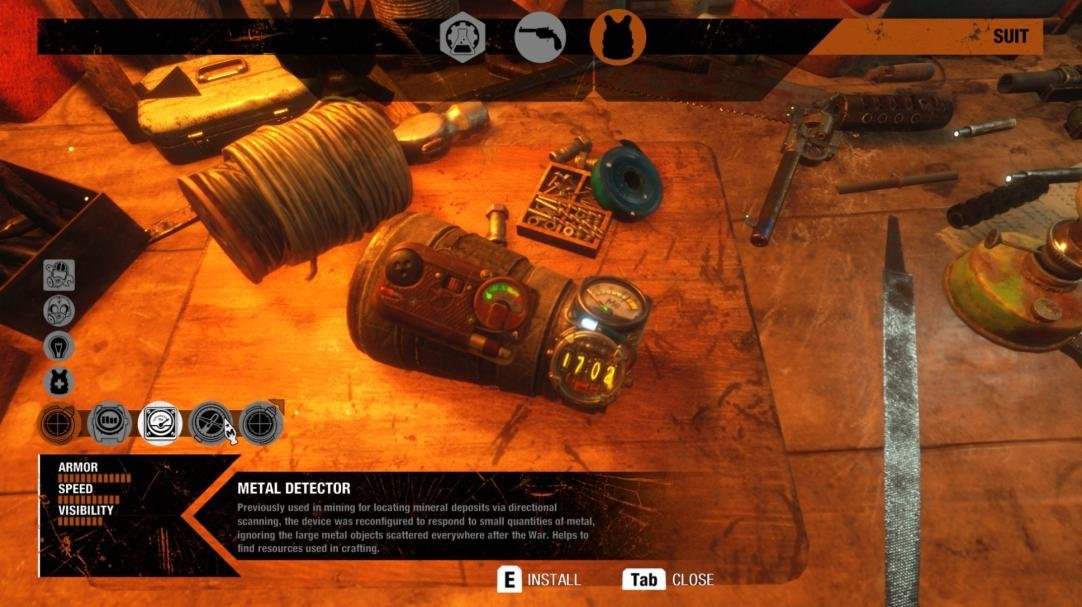
- Description. This device was initially constructed for exploration of mineral deposits but was reconfigured to search of small amounts of metal. It does not respond to heaps of rusty iron scattered everywhere after the War, so it is very helpful in search of resources for crafting.
- How to unlock: at the Volga location. High silos towers (or something similar to them) are located in the lower right corner of the location. In one of the towers, you will find a teddy bear for Nastya (the marker will appear on the map). Descend and go left on the map to find a locked hut. Break the lock and pick up the upgrade.
Compass

- Description. The compass on your bracer always indicates the direction in which you should move.
- How to unlock: at the Volga location. Search for it in the wreckage of a downed plane to which you will come after church (after you have met Duke). If you do not find it on the Volga, you’ll be able to pick it up from Giul in the lighthouse.
Motion Scanner
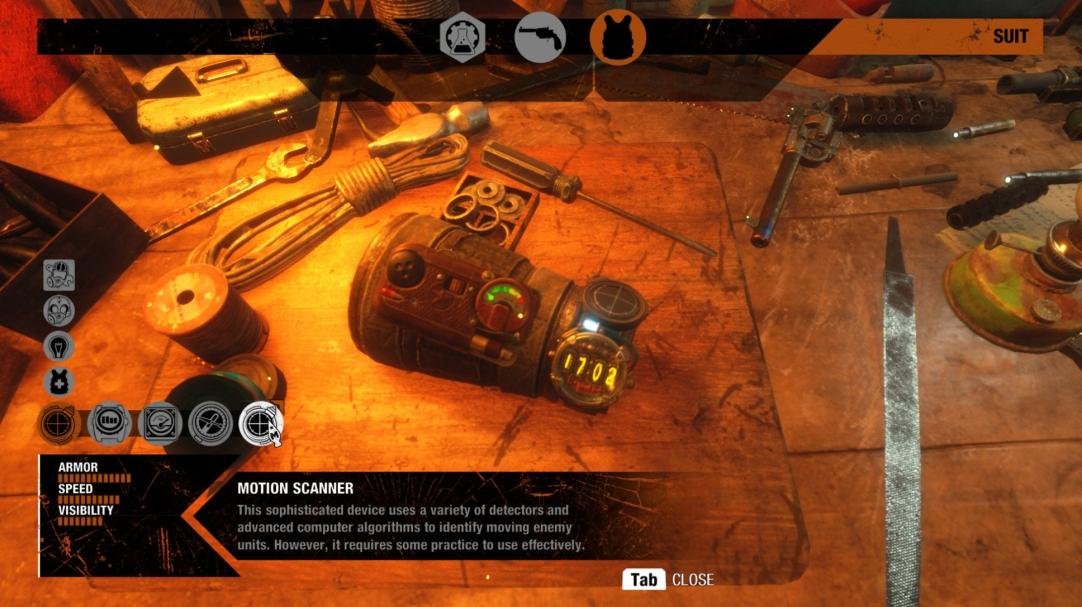
- Description. This device uses various detectors and complex algorithms to identify moving opponents. However, it requires practice for effective use in battle.
- How to unlock: at the Caspian location. In the left part of the location, there’s a wrecked barge right on the road. Slaves are working near this barge. Go to the very top, killing enemies, and find the upgrade.
Metro Exodus – The Caspian Walkthrough
The Caspian Walkthrough
Unlike the Volga location, the Caspian won’t offer separate side quests, but you can still examine a few interesting places here.
How to get a car
After you have arrived in the desert, proceed towards the building with a high antenna. Go upside, killing monsters along the way, and find an oilfield worker. Having killed him, you will get the key from the only car that you can drive in the game.
However, if you hesitate, the mutants will either kill the oilman or he will run somewhere, while the game’s script won’t work upon arrival on the roof, and nobody will attack Artyom. You will deprive yourself of the ability to drive a vehicle.
Flask for Nastya
After you visit the lighthouse and meet Giul, she will take you to an underground bunker. The girl will ask you to find at least one thing that belonged to her mother – and you can do it. When you will be investigating the complex, you will hit the closed door at some point. Damir will start communicating over the speakerphone. Go to the room on the right and crawl to the adjacent room. Here, you will find a table with a note. The door leading to the office with Gulnara’s mother corpse will be on the left from this table. Having got out of the bunker, Artyom will automatically give this photo to Gul, and she will give him a flask as a reward. You can give the flask to Nastya from the train.
Points of interest on the map
After the bunker where you were accompanied by Giul, you will drive on the road until the sole question mark. Having arrived at the site, listen to Anna who will tell you about three interesting objects – a crane, a torn ship and a building behind the port. The corresponding markers will appear on the map.
Having climbed the crane, you will be able to get the sniper and take his rifle. Also, there’s a workbench and spare parts inside the crane.
If you go to the ship moored to the shore, you will be able to save hostages. Inside the ship, in the main compartment, you will find a cabin from a container. There is a table where you will find either resources or an armored helmet if you haven’t found it on the Volga. Get to the captain’s cabin where there is a postcard and a note, then go out through any of the side doors and pull the lever. Thanks to this, you will free the hostages.
Finally, go to the building behind the port which is located further down the rails from the Aurora. There are a few buildings there, but you are interested in residential buildings rather than hangars. Go upside, kill mutants and bandits and get to the observation point. Here, there’s a workbench and an upgrade for night vision goggles.
Along the journey in the game world, you will listen to the message from the Baron who is dissatisfied with the situation near the Source. A white question mark will appear on the map. Move to the upper left corner, clear the canyon from enemies so that a rope ladder descends in the far part of the location. Climb this ladder – you will hear a shot. You will find a suicide note near a dead body and an armored glass for the helmet in the nearby. This upgrade will allow you to protect the glass of the gas mask during battles.